Summary
Introduction: Why WordPress?
Step 1: Domain and Hosting
Step 2: How to Install WordPress
Step 3: How to find and install a WordPress Theme
Step 4: Basic Knowledge of WordPress
Step 5: Essential Plugins
Go live!
How to Start a Blog: Why WordPress?

Why should you choose WordPress? The answer is simple. Because it is currently the best tool in the world for those who want to be a blogger. It has a large community behind that supports it every day, in fact, suggestions for improvement come from all over the world.
With WordPress you are free to put all contents you are interested in. It makes your blog more professional than a site hosted by a platform such as Blogger.com. In fact it allows you to customize and personalize your site completely.
I will explain how to create a blog step by step. Starting from choosing a right domain and ending with a publication of your first post.
Step 1 – Domain and Hosting
Domain
Before you decide how to name your blog, you should take care to choose your niche carefully. A niche is simply what topic you will focus on for your blog. It is also recommended to use a name that is not too long. People tend to forget long, complicating domain names.
But how to find a niche? First of all, think about your passion. Then try to determine if there are people who are looking for a solution to a problem related to your knowledge. And at the end, you have to create a value added to meet these needs.
Here there are some tools that can help you.
Domainr
Domainr helps you find the perfect name for your company or project by exploring the entire domain name space beyond the ubiquitous and crowded .com, .net, and .org.
Lean Domain Search
Lean Domain Search is a domain name generator that helps you find great available domain names for your websites.
BustAName
Bust a Name is a tool that helps you find domains and manage them.
Looka Business Name Generator
The Looka Business Name Generator helps you brainstorm ideas, check availability, and see logo ideas instantly.
Did you find the name for your domain? Well, it’s time to register it. I always recommend to register the domain using the same web space provider (hosting) because usually the domain is included in the price.
Hosting
Which one to choose? I’ve tested a lot of them in recent years, the best one with a good quality / price ratio is Dreamhost. The support is wonderful, 24 hours a day, 7 days a week. Moreover they solve all kinds of problems in a day
I have a giveaway for you, a special discount of 50$ off for a subscription for the first year of hosting.
You have to follow this url to get the discout:
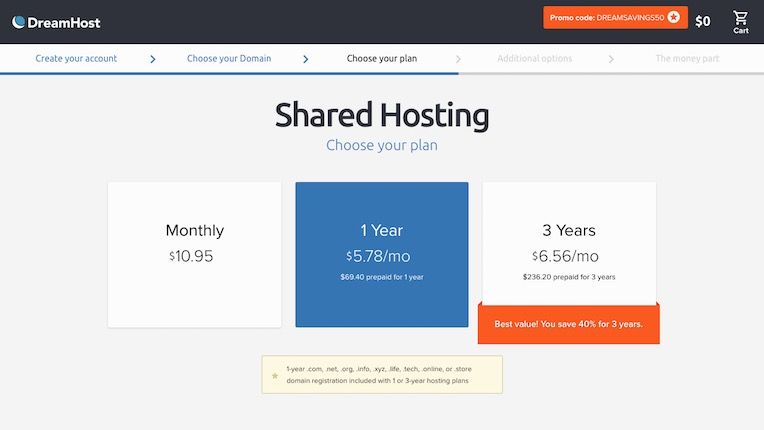
Basically you’re going to pay for the first year only $ 69.40 instead of 119.40.
The provider is Dreamhost that will offer you:
Unlimited Space
Unlimited Email
One free domain
One Click WordPress Installing
Support 24/7
And now I’ll explain the registration step by step.
1) Go to this page and click on Get Start Now

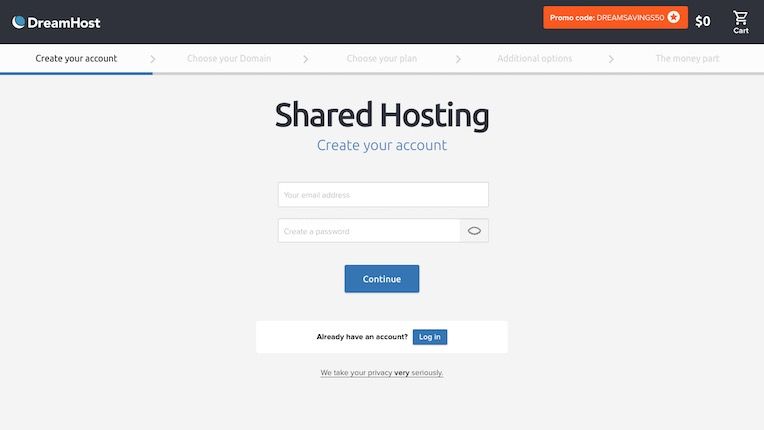
2) Enter your email address and a password. Click Continue.
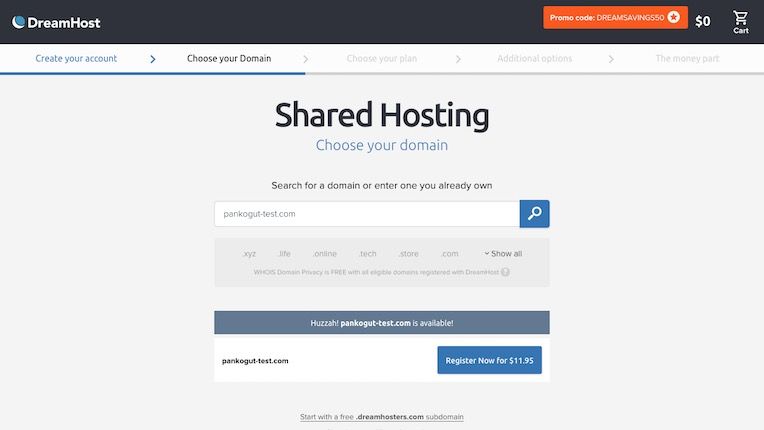
3) Enter the domain name you want to register and click on Continue.
4) Choose the plan. I suggest the second one to get the $50 off discount.
5) Enter your details. After entering the data for the payment and the flag of Terms of Service, click on Place Order Now
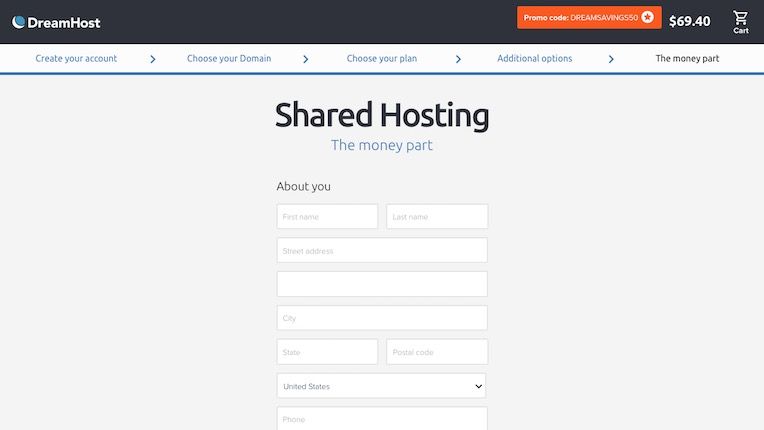
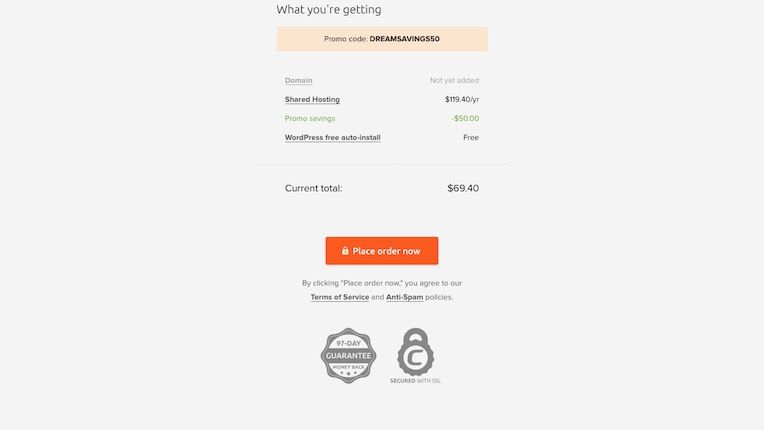
You just got your domain and web space. Within a few hours you will receive a confirmation of your domain registration by Dreamhost. Now we can move to the next step: the installation of WordPress.
Step 2 – How to Install WordPress
The most hosts have adopted the modern web apps that should help you to install the CMS with a simple click. I am going to explain step by step procedure of WordPress installation on your new domain.
1) Log In to your Dreamhost’s control panel and click on Manage Domains

2) Click on Add under Web Hosting and enter the user name that will manage this domain. Click on Fully host this domain
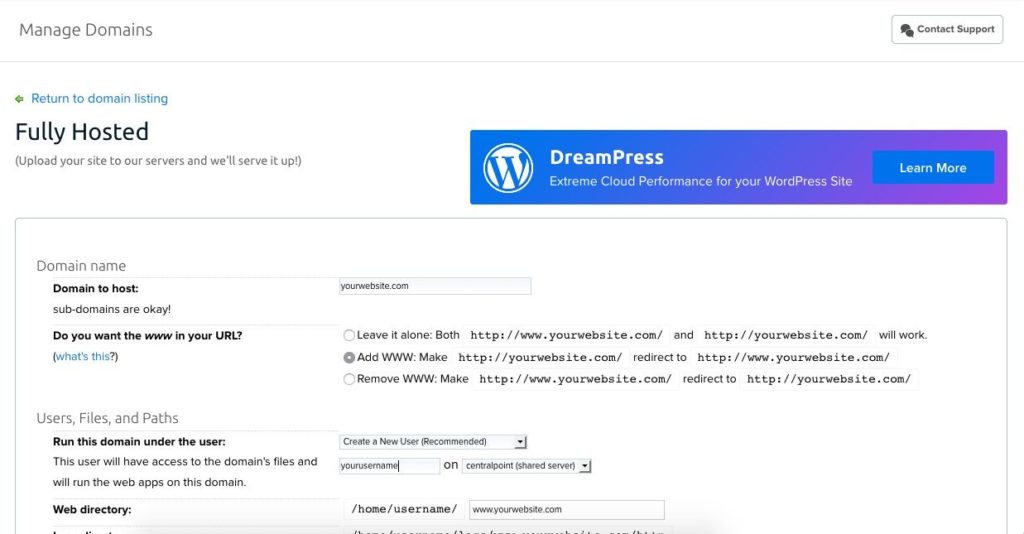
With only two steps you activated your web space connected to your new domain. Usually after about 10 minutes the space is active. Now you can install WordPress. Remember to keep your user name and password that is released automatically. You’ll need them later.
3) Now click on the One-Click Installs from the menu on the top left. Click on WordPress. It will open an external window.
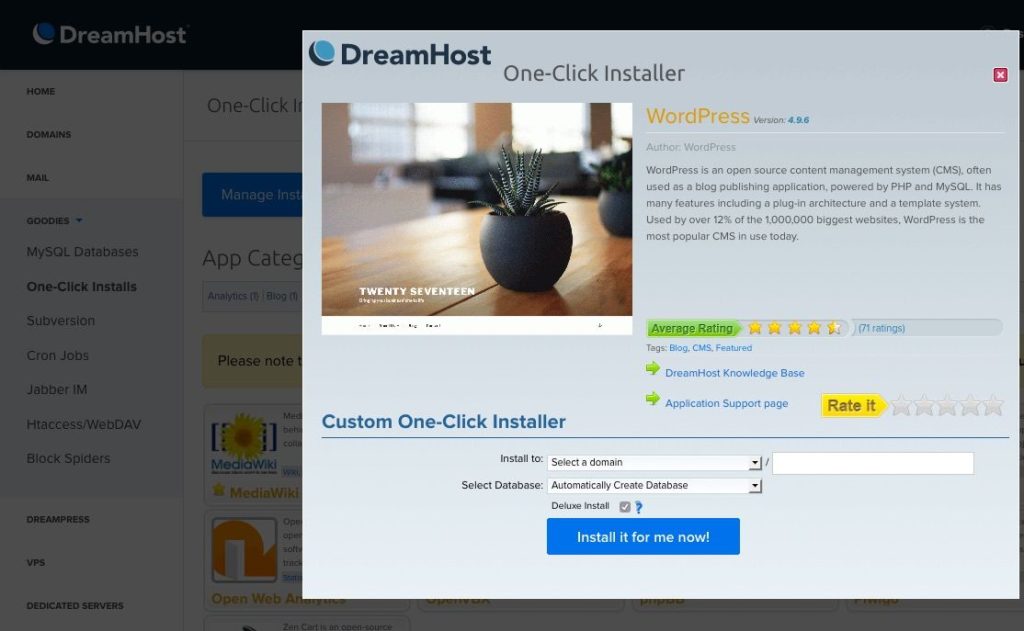
Select the domain and click on Install it for me now! After 10 minutes you should receive an email from Dreamhost with your admin username and a link to reset your password.
4) Your website is live!
In the next step you will learn how to choose the theme for your needs and install it.
Step 3 – How to find and install a WordPress Theme
Choose the WordPress Theme
I think that this is the most difficult phase, the choice of the theme that checks off most of the needs on your list. There are thousands of great WordPress themes out there, free and paid, Which one to pick?
You can start with a free theme. You can find good themes on wordpress.org. Sometimes it is a light version that you can upgrade to the paid version later. You can choose to launch your blog with a premium theme.
What is the difference between a free and a paid theme? In addition to the design and the supplementary options, the real surplus is the support in case you need a little help with the setup of the theme.
My clients often are grateful for my, even if it’s minimal, help in the initial setup of their blog. Have a look at our themes, just click on the button below.
Install the WordPress Theme
The first advice I give to all my clients is not to install the theme just purchased. Sounds strange, I know! It is much more secure to activate the Child Theme.
Why the Child Theme?
If you need to upgrade the main theme, you risk losing all your theme customizations. In practice Child theme inherits all the features of the father theme.
How do I create a Child theme?
Usually it consists of naming a new folder with the main theme name (the father theme name) and adding to it word “-child”.
Create inside the folder a file named style.css with the following parameters:
/*

Theme Name: FoodyPro

Child Theme URI: https://pankogut.com

Description: Child Theme for FoodyPro

Author: Your Name

Author URI: http://example.com/about/

Template: foodypro

Version: 1.0.0

*/
Now create a second file and rename it with function.php. Inside the new file paste in the following code:
<?php add_action( 'wp_enqueue_scripts', 'enqueue_parent_theme_style' ); function enqueue_parent_theme_style() { wp_enqueue_style( 'parent-style', get_template_directory_uri().'/style.css' ); } ?>
Then you can upload the folder to your site via FTP or you can create a zip file and upload it using the WordPress dashboard. I’ll explain shortly how to go either way.
Install a theme through the dashboard of WordPress
1) Click on Appearance>Themes>Add New>Upload Theme
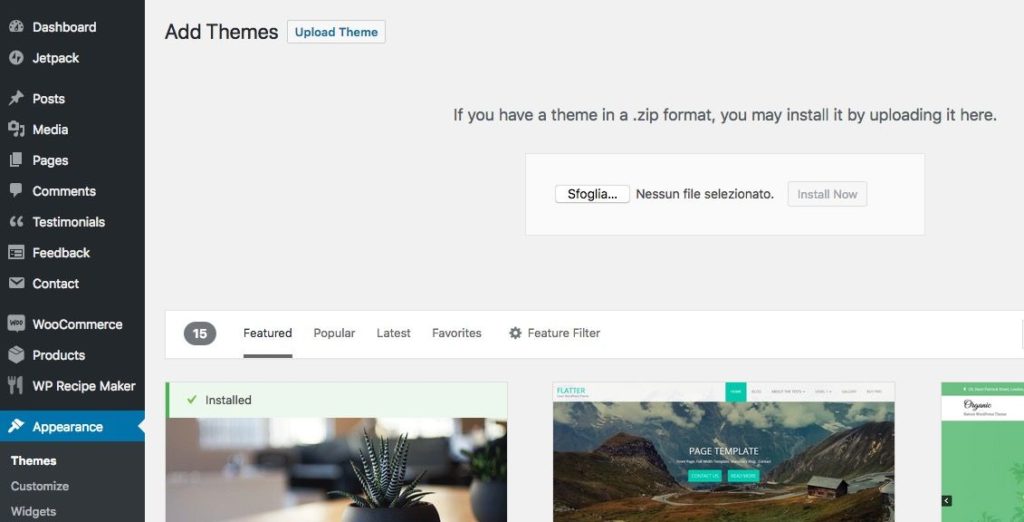
2) Upload the first theme father “FoodyPro” and click on Install Now
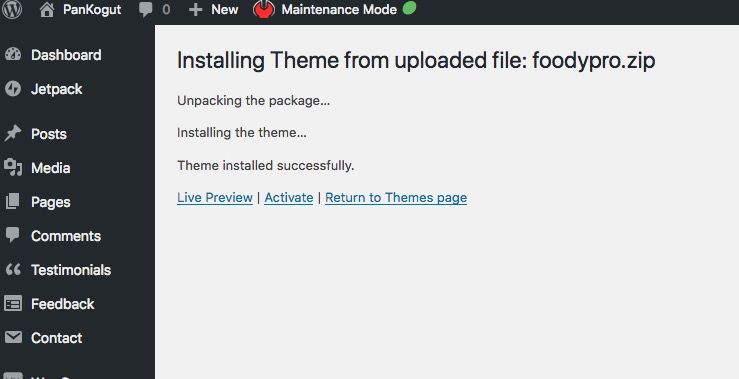
3) Click on Return to Themes page and repeat the first point with the Child Theme
Now you can click on Activate.
Install a theme through FTP
1) First of all install FileZilla on your computer and run it.
2) Click on File>Site Manager and then on New Site.
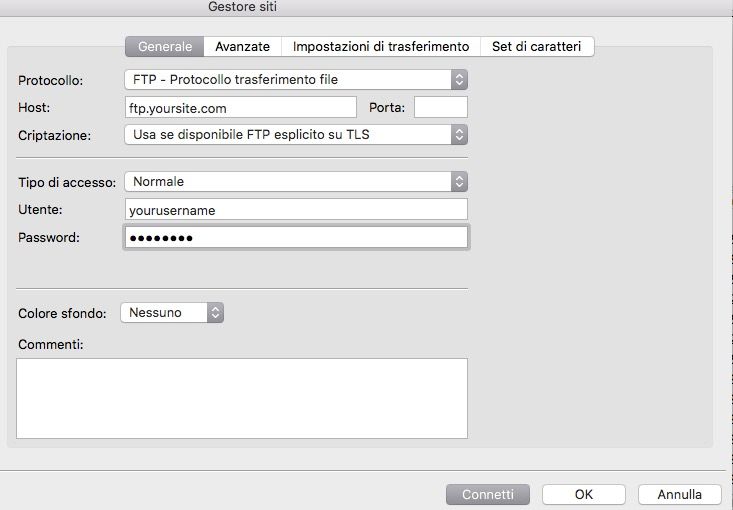
From the panel of your host (on Dreamhost Users> Manage Users), you can recover the credentials of your ftp account.
3) Fill in the following fields:
Host: ftp.yourdomain.com
Logon Type: Normal
User: username made on dreamhost
Password: password issued by dreamhost
4) Click on Connect. On the right side you will find your web space with your site. Placed on “/mydomain.com/wp-content/themes”

Select the folder of the theme and the theme father FoodyPro Child. Click with the right button of the mouse on Upload.
5) At this point you can return to the WordPress dashboard and under Appearance> Themes you can activate the Child Theme of FoodyPro.
How to update a theme through FTP
You actually need to apply the same instructions of the installation via FTP. In this case, you have to overwrite only the father theme FoodyPro with the latest version. In this way you will not lose any customizations applied to the Child theme.
Options Panel
The premium themes in most cases also have an options panel.
In the past, you would found the panel as a new tab in the dashboard. Nowadays, also in FoodyPro, you will find options in the Customize Panel under Appearance.
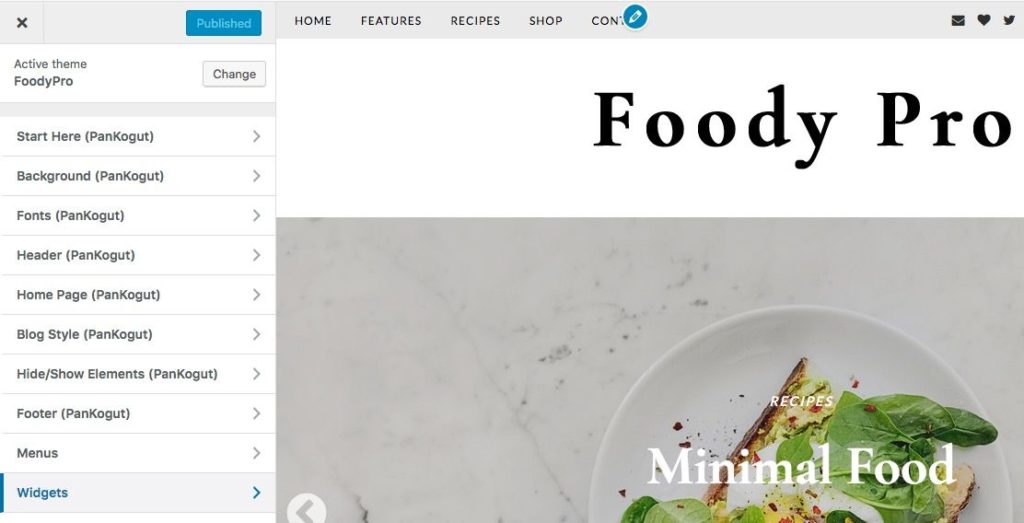
In the left area there are various sections with single options. You can change the colors, fonts, add css code, etc… And in the right display you can see in advance, before saving, various changes you’ve been making.
Step 4 – Basic Knowledge of WordPress
Create a new page
Click on Pages>Add New
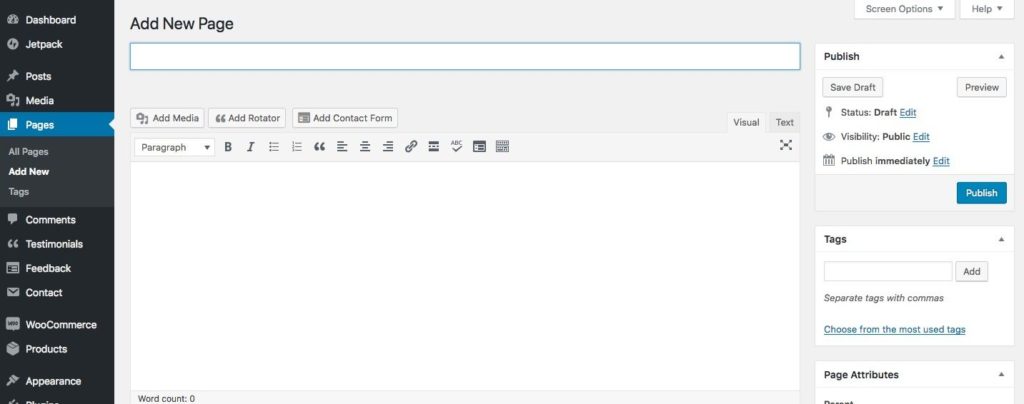
You can insert the title of the page in Enter title here and the content in the box under.
Disable comments by clicking on Screen Options at the top right.

Put the flag on Discussion and move under to the box content.
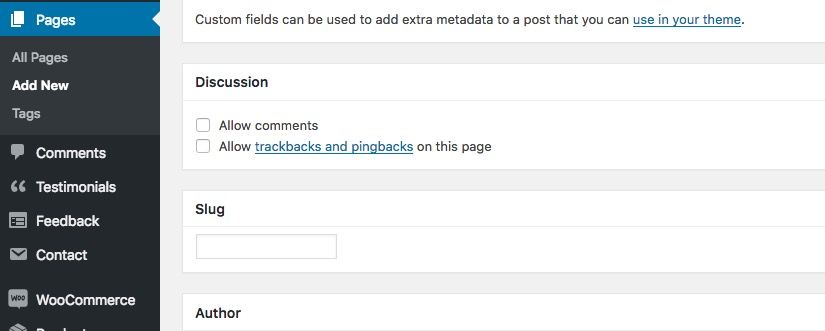
Remove the flag from both items.
Select a template other than the default in the box on the right Page Attributes> Template. Often themes allow you to create a page without the classic sidebar or in a different position.
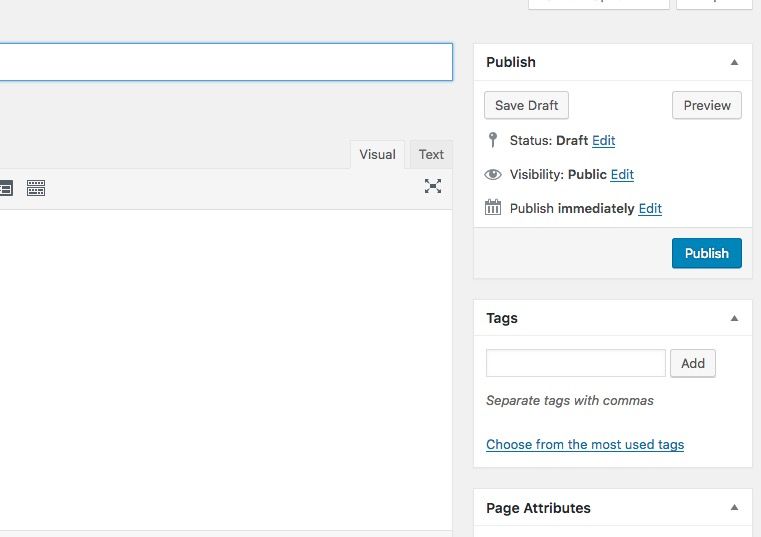
In the box on the right named Publish you have some useful options. You can, for example, choose the visibility of your page, make it private or even only accessible via password. You can also choose a publication date different from today.
Are you ready to publish your first page? Click on Publish.
Create a new Post
Click on Posts>Add New
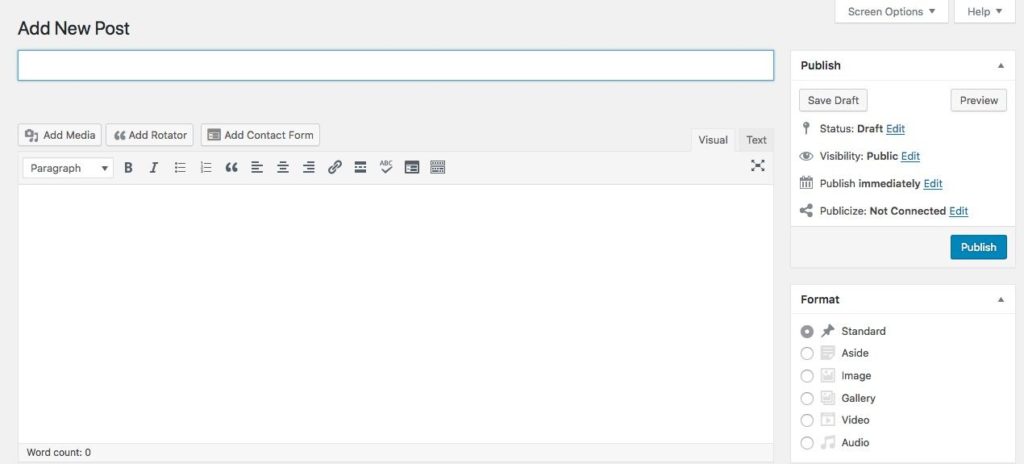
As for the pages here you can enter a title and the content of the post. You can also add media like photos clicking on Add Media.
Unlike pages you will find some new box on the right:
+ Format → There are various post formats supported by the installed theme.
+ Categories → Here you can create or select the categories for your post.
+ Tags → Keywords related the theme of your post. Tags are useful in the research, to create links to specific sections with a particular tag.
+ Featured Image → You can upload an image that usually is at the beginning of the post.
+ Publish → It is exactly identical to that of the pages.
Finally, click the “publish” button.
Create a new menu
You’ve created some pages and published some sample post. Now you should create a menu that will help your readers navigate your site.
Click on Appearance>Menus
First of all click on create a new menu. Give it a name and click on Create menu.
Select on the right side the various links. You can choose between the pages created, or create a custom link or by categories. If you click on the Options screen you can activate other sources such as tags, posts, etc …
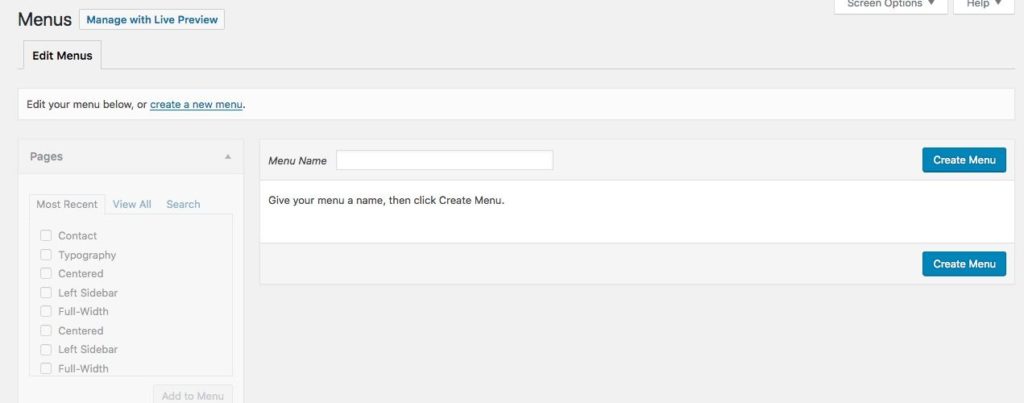
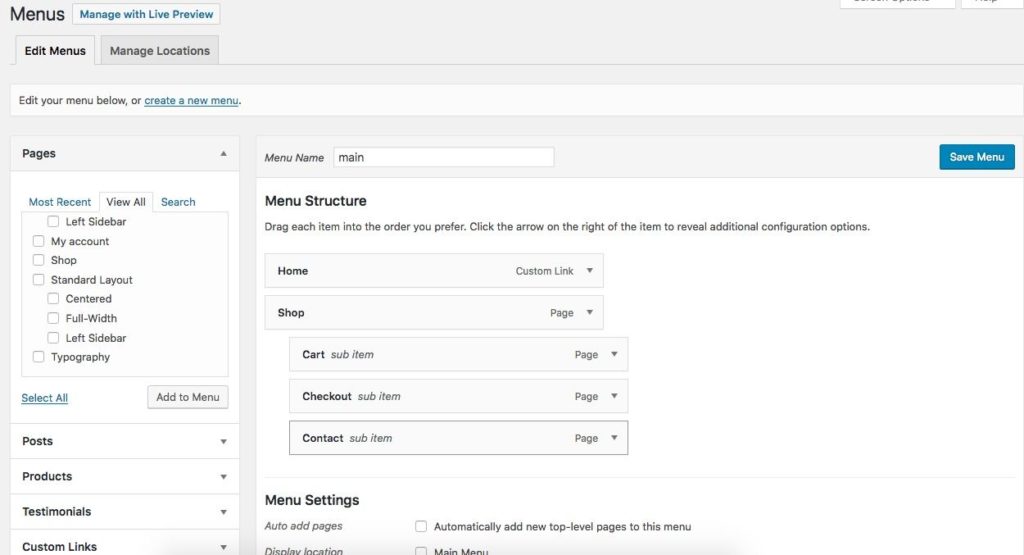
Put the flag for example on the three-page and click on Add to Menu. Now select the location to which you want to associate your menu. In this case there is only the Main Menu and click on Save menu.
In case you want a sub-menu, you must move to the right the item.
Sidebar
Click on Appaerance>Widgets
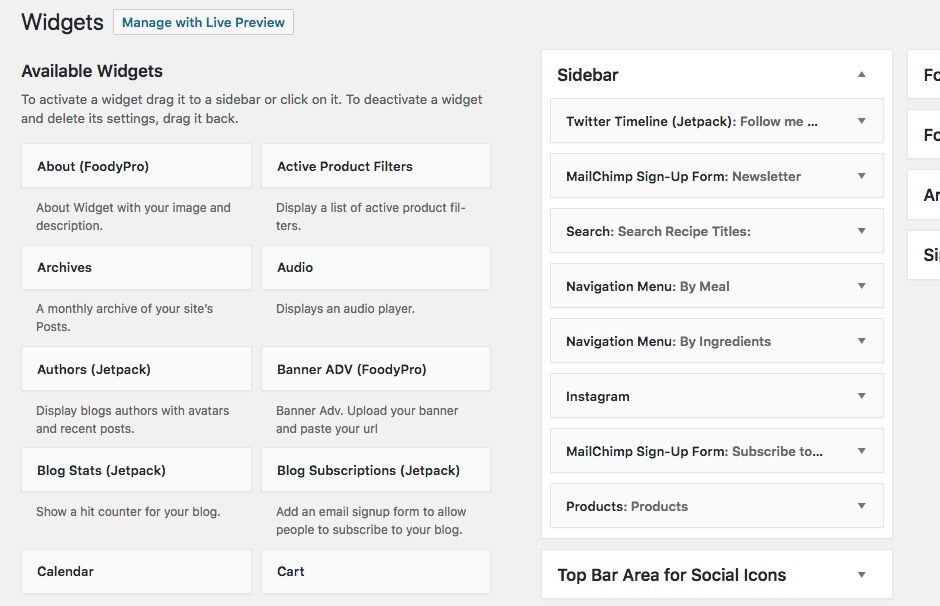
In the left there are all the available widgets and in the right area you can choose where you can place a particular widget. In this case you have the area Sidebar and Footer Sidebar Full Width.
You move for example the widget About.
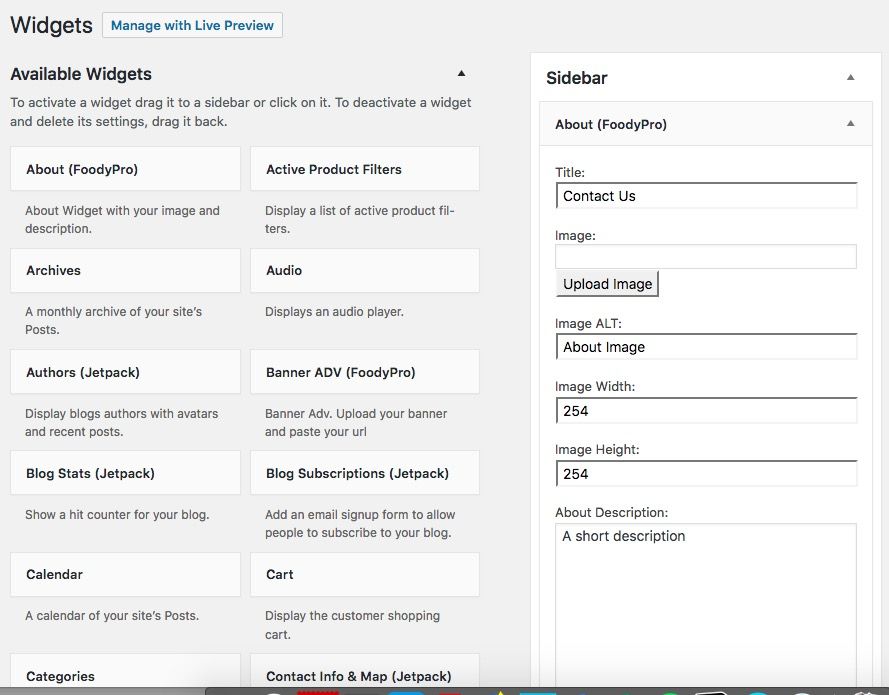
You can decide to change the title, add the link of your own pictures before loaded in the Media and write a short text in the About Description. Finally, you can also add links to your social profiles like Facebook, Pinterest, etc …
Click on Save and go to see what happened in the home of your blog.
Comments
When a visitor writes a comment on your post, you receive an email notification. In the comments section, you can decide whether to approve the comment and reply.
Click on Approve, then on Reply. Write your reply and click on Reply.

In the section Settings> Discussion you can choose to disable comments on all pages or allow anyone to post a comment without the approval.
Settings
General Settings
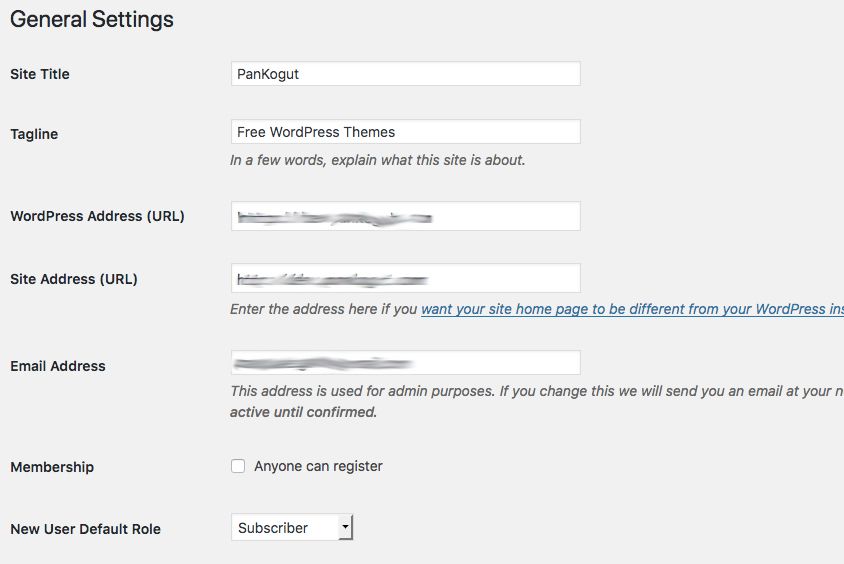
On the general options you can choose the name of your website and a brief description.
You can activate the sign up for anyone who you wishes. Put the flag on Membership and associate to the new members a specific role. From simple subscriber to administrator.
Writing Settings
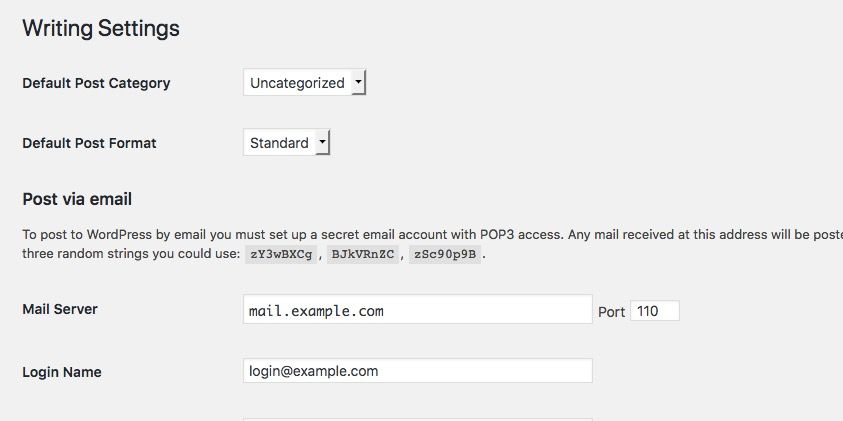
In this area you can choose the category and type of your post.
Reading
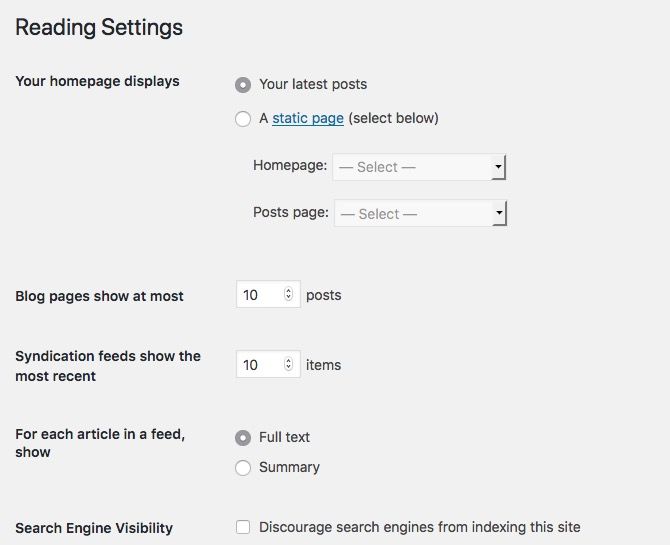
The Reading section is one of the most important. It allows you, for example, to set a page as the home page instead of the usual blog.
How to set a custom page as a home page?
1. Create a new page and name Home
2. Create a new page and name Blog
3. Back to the Reading section and select A static page
4. Set as Front page the Home page
5. Set as Posts page the Blog page
I suggest to add to the menu the page Blog to allow readers to move from the home page to the blog.
Media
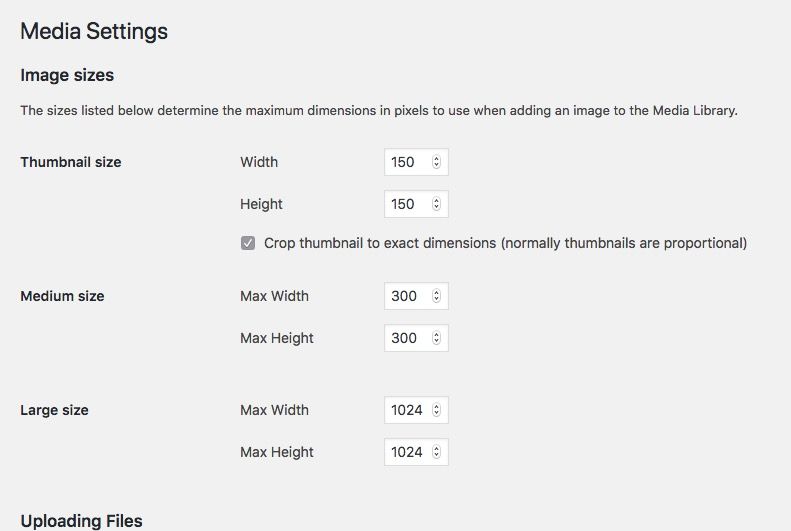
In the media section you can change the standard size of uploaded images to your posts or pages.
Permalinks
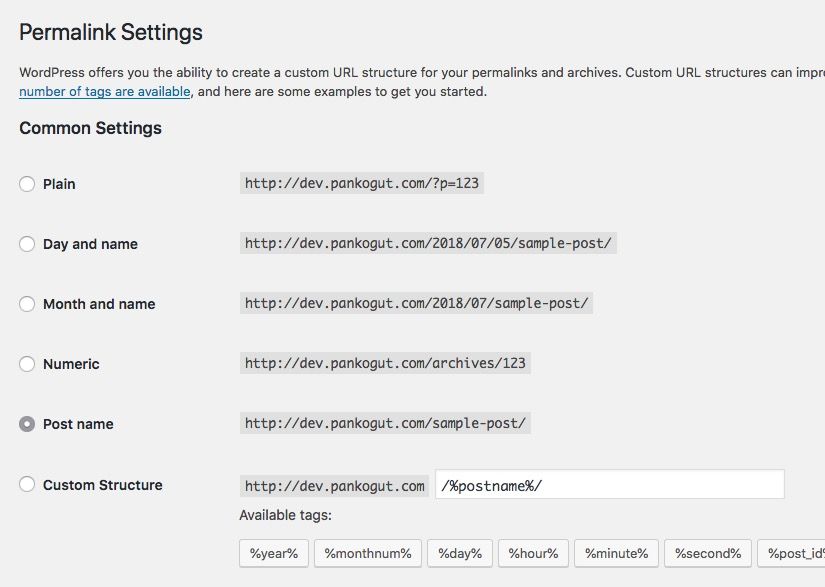
In the Permalinks section you can set the type of link that WordPress creates for each page and post. I always advise the use of the default. It’s always better to have a link descriptive rather than numerical.
Privacy
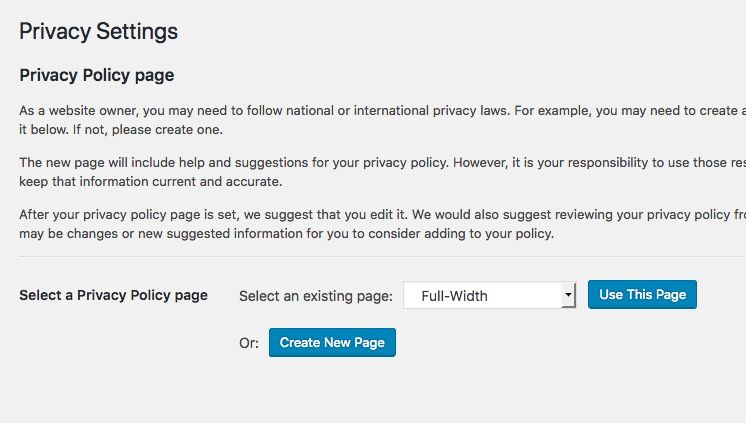
Here you have to create or choose your privacy page.
Step 5 – Essential Plugins + Google Analytics
Jetpack
It is the best plugin ever, created by the developers of WordPress. It integrates your blog with a lots of useful functions such as:
+ Sharing post on social networks
+ Subscribing to the blog or individual posts
+ Statistics
+ and more
You have to connect it to a free account on wordpress.com
Once plugged in, just go to Jetpack> Settings where you can enable or disable various options.
FoodyPro is compatible with the option Featured Content Jetpack. After installing the plugin the Featured Content Section will appear in the Customize Panel.
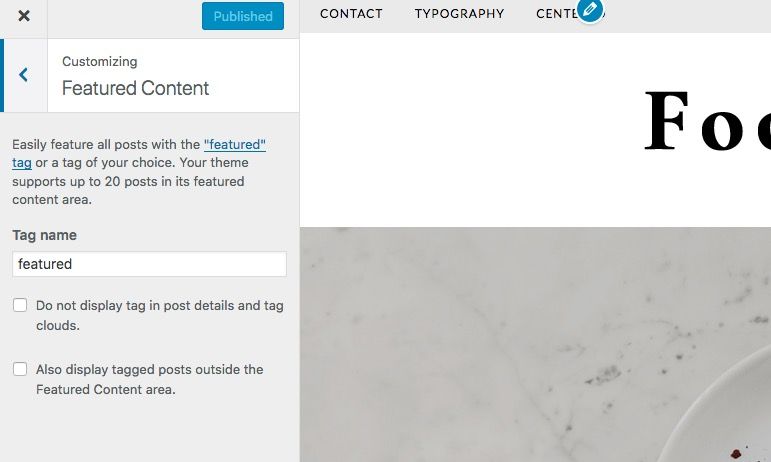
You can insert a tag such as “featured” to enable the Featured Posts theme. If you assign the tags featured in a post, it will show up in the featured section. So you can activate the layout grid with 2 columns for the old posts.
Other plugin recommended
WP-SpamShield Anti-Spam → Great plugin to protect your blog from spam.
Yoast SEO → The best plugins for SEO.
Wp-Super Cache → To streamline your site.
Wordfence Security → Protect your site from attack.
BackWPup Free → The backup is essential for a blog.
How to add Google Analytics to your blog?
Once you have the code from google analytics copy and paste it in the field Appearance>Customize>General Style>Google Analytics
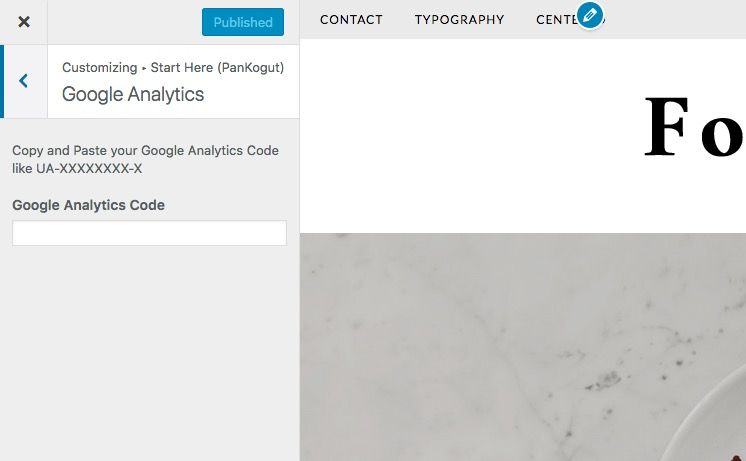
In case your template has not a similar option, you can install a plugin like this: Google Analytics Dashboard for WP
Go Live!
Are you there. Have you prepared your blog with all the essential options? Now you’re ready to jump into the world.
The first tip is to post quality content. If you are a food blogger create posts with recipes step-by-step or video tutorials.
The web is not saturated. There is space for everyone. Some people blogging for fun, others to turn it into a full time job. There is no secret to be revealed. There is no magic wand. You must have constancy and offer quality content to your target.
So I suggest you to publish regularly, share on social network and ask for a feedback.
Good luck! I hope I helped you starting your blog without stress.

